Flocking 12" LX200R Milton Hill Observatory Est 2003
Home Contact MHO
Use this procedure at your own risk.  I assume no responsibility for you doing damage to your scope.  This procedure worked for me and was not hard to do but I do have many years experience taking telescopes apart and building them.
Removing the corrector plate.
Picture
Remove the 6 screws from corrector plate retaining ring and then remove the ring. Make sure the plate does not fall out, mine was loose at this point.

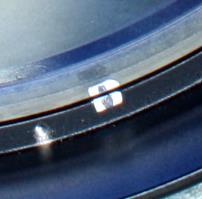
Mark the corrector plate and cell so you can reinstall it later correctly.
The plate on my scope was already marked with white paint by Meade.

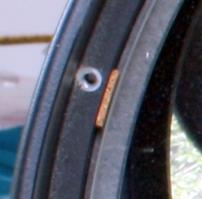
Keep track of the position and size of any spacers around the corrector plate.
Flocking the tube.
Picture
The inside area to be flocked was measured and the circumference divided into 3rd's.   A overlap of 1/2 inch was added to each piece before cutting. The backing was peeled back 2 inches before placing the flocking into the tube.
Picture
The flocking is placed in the tube sticking and pressing to the tube as the paper backing is being peeled off.  About 1/2 of one of the 3 sheets is done in this picture.

Picture
One of the 3 flocking sheet has been installed.
Picture
Beginning the 2nd sheet.

Picture
Two of the three sections have been installed.  Notice the difference in the internal tube reflections!
Picture
Flocking done.  The corrector plate is still removed.
Flocked tube.
Picture
Corrector plate inserted with retaining ring in place.
Last update 24-Feb-2010 v1.0